
Table of Contents
- What is Visual Studio Code?
- How to install Visual Studio Code
- Configuring VS Code for front end developer
- Configure VS Code for HTML and CSS
- Configure VS Code for JavaScript Development
- Using Git with Visual code editor
- setting up Visual Studio as a difftool for git
- Installing and configuring ESLint in VS Code
- Uninstall Visual Studio Code
In this tutorial, I want to show you how to install and configure Visual Studio Code. In Linux, the program can be installed in several ways, and I will describe three of them below.
Visual studio Code is very light weight IDE and can be configured for many programming languages. In this article, we will see how we can configure Visual Studio Code for frontend developers.
What is Visual Studio Code?
Visual Studio Code, or simply VS Code, is a free, popular and add-on text editor primarily designed for building and debugging modern web and cloud applications.
It was developed by Microsoft and is available for Windows, MacOS and Linux operating systems.
This program is distributed free of charge, its source code is available on GitHub.
VS Code supports a wide range of programming languages, including a debugger, Git tools, syntax highlighting, IntelliSense autocompletion, refactoring tools, a terminal etc.
VS Code is quite flexible and extensible with plugins available on the Visual Studio Marketplace . You can open the panel with extensions in the program using a key combination Ctrl+Shift+X.
There are a lot of plugins available for Visual Studio Code, but in this article we will consider only the most popular of them. VS Code comes with Emmet which speeds up writing code.
How to install Visual Studio Code
To install VS Code on your computer, download appropriate version available for your operating system from Visual Studio website. After downloading the program, follow the wizard install it on your computer.
Visual Studio Code has a huge number of different plugins. They are intended to expand the functionality of the editor. All plugins for VS Code are hosted in the VS Code Marketplace.
Installing Visual Studio code from terminal
In this example, we will see how can we install VS Code on Ubuntu through terminal. Before we start with VS Code installation, we need to install several packages. Run the following command to install the packages.
sudo apt install software-properties-common apt-transport-https wget
Now we will install repository
wget -q https://packages.microsoft.com/keys/microsoft.asc -O- | sudo apt-key add -
And add the repository itself:
sudo add-apt-repository "deb [arch=amd64] https://packages.microsoft.com/repos/vscode stable main"
Now, update the package lists and install VS Code:
sudo apt update
sudo apt install code
Once the installation is complete, you can start the program from terminal.
Installing Visual Studio Code using snap
If the previous method did not workout, you can install the Visual Studio Code editor from the snap package. For this:
Enable snap support if it is disabled:
sudo apt install snapd
When finished, run the application
To install snap package manager, run following command in terminal.
sudo snap install --classic code
Installing Visual Studio Code from a deb package
Probably the most familiar option for Windows users is to install the application from the installation file. For Debian based distributions, these are deb packages. Follow the steps to install VS Code using Deb package:
- Download the deb package from the official site of the application.
- Go to the download directory and double-click on the downloaded file.
- This will launch the Application Center if you have Gnome, or some other installer, for example GDebi, where you will need to click the Install button.
- Install the package.
Configuring VS Code for front end developer
VS Code contains various settings that helps in customizing the editor. User can change the settings through setting window. There are multiple ways, user can open setting windows in VS Code.
- By selecting settings from code >> preference in mac
- By pressing Ctrl + ,
- Click gear icon from bottom left and select settings
The parameters that most often configured are:
editor.tabsize– the number of spaces for tabulation;editor.insertSpaces– insert tab vs spaceeditor.wordWrap– controls how lines should be wrappededitor.detectIndentation– tav vs space for indentationeditor.fontSize– font size in pixels;editor.mouseWheelZoom– Increase the font size on mouse scroll with ctrl key pressededitor.minimap.enabled– enables or disables the display of the mini-map;editor.formatOnSave– enable auto formattingworkbench.startupEditor– configure startup screenfiles.insertFinalNewline– enable auto insert empty line at file savefiles.autoSave– enable file auto- save
files.trimTrailingWhitespace– enable auto remove trailing white space at file save files.trimFinalNewlines– enable auto remove empty lines at file savetelemetry.enableCrashReporter– enables the submission of crash reports to a Microsoft online service.terminal.integrated.cwd– allows you to set an explicit launch pathtelemetry.enableTelemetry– enables or disables sending usage and error information to a Microsoft online service.
How to configure VS Code settings locally
You can change the settings both globally and locally to the current project. Changing global settings is carried out in the “Options” window on the “User” tab. These settings are saved to the “settings.json” file. You can open it by clicking on the “Open Parameters (JSON)” icon. Open the file in VS Code and edit and save it.
{
  "editor.wordWrap": "wordWrapColumn",
  "editor.minimap.enabled": true,
 "editor.wordWrapColumn": 20,
  "editor.formatOnSave": true,
  "editor.detectIndentation": true,
  "editor.tabSize": 4,
  "editor.fontSize": 12,
  "workbench.startupEditor": "none",
  "editor.mouseWheelZoom": true,
  "files.insertFinalNewline": true,
  "files.trimTrailingWhitespace": false,
  "files.trimFinalNewlines": false,
  "telemetry.enableCrashReporter": false,
  "telemetry.enableTelemetry": true,
  "files.autoSave": "afterDelay",
  "files.autoSaveDelay": 1000
}
Saving settings for the working directory is performed in a special file “settings.json”, which will be added to the “.vscode” folder. Setting parameters for the working directory (project) can also be done simply by editing this file.
Configure VS Code for HTML and CSS
Visual Studio Code provides basic support for writing HTML and CSS out of the box. Includes syntax highlighting, smart add-ons with IntelliSense, and custom formatting. VS Code also has excellent Emmet support.
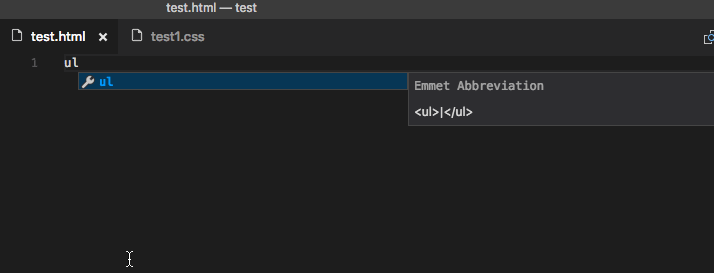
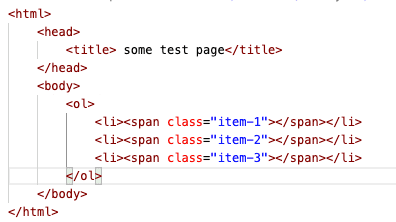
Why is Emmet needed? It allows you to write code very quickly.
For example, the Emmet abbreviation ol>li*3>span.item-$ upon pressing a key Tab will generate the following code:
In CSS, the abbreviation Emmet dn will generate code display:none.
VS Code has built-in code formatting tools. You can customize the formatting options in the settings. It is located in the sections “Extensions -> HTML” and “Extensions -> CSS”.
The keyboard shortcut for performing formatting in VS Code is Shift+Alt+F.
The functionality of VS Code when working with HTML and CSS can be improved with extensions.
Here is a list of some of configurations for HTML:
- Auto Rename Tag – automatically changes the name of the closing tag when renaming the opening tag;
- Auto Close Tag – automatically adds a closing HTML / XML tag when you enter the closing parenthesis of the opening tag (except HTML, this add-on adds this feature to JavaScript and many other languages);
- HTMLHint – plugin for static analysis of HTML code;
- HTML CSS Support – CSS support for HTML documents;
- IntelliSense for CSS class names in HTML – Plugin for suggesting CSS class name completion suggestions in HTML based on the definitions it finds in your workspace.
- Autoprefixer – to automatically add CSS properties with prefixes;
- CSS Peek – allows you to see properties attached to a class or identifier without switching to the CSS file in which they are described;
- Prettier – Code formatter – for formatting code (HTML, CSS, JavaScript, etc.);
Configure VS Code for JavaScript Development
You can leverage WSL on Windows to run Linux native commands on Windows. This is new feature available in Windows 10.
Web project development in Windows 10 can be entered not only by using application, but also through WSL (Linux). If you like Linux and want to use it, then Windows 10 allows you to do this out of the box. The next section provides instructions on how to install WSL on Windows 10 and configure Visual Studio Code to use it as a development environment.
Most of the production environments run Linux and this feature is very useful, if you want to run your code in production like environment without installing Linux.
How do I install WSL on Windows 10 and use it in VS Code?
Windows 10 introduces the ability to do web development right in a Linux-based environment. To do this, you just need to enable the Windows 10 Windows Subsystem for Linux (WSL) component and install your favorite Linux distribution from the Microsoft Store.
The WSL installation process is described in more detail in this article , namely in the sections “Enabling the Windows Subsystem for Linux” and “Installing the Ubuntu Application”.
Installing the “Remote – WSL” extension in VS Code.
To use WSL as a full development environment directly from VS Code, you need to install the “Remote – WSL” extension.
This will allow you to introduce web development right in a Linux-based environment, use its specific toolkits and utilities, run and debug your applications on Linux without leaving Windows.
This extension will allow you to execute commands directly in WSL, as well as edit files located in WSL or Windows mounted file system without worrying about compatibility issues.
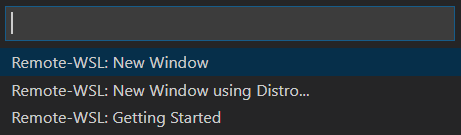
After installing the extension and restarting the VS Code editor, you will have a WSL indicator in the lower left corner of the program window.
Clicking on it will show you the Remote-WSL commands. Using these, you can open a new VS Code window that will use WSL as the environment.
In this case, the command “Remote-WSL: New Window” will do it using the Linux distribution that you have assigned by default, and the command “Remote-WSL: New Window using Distro …” – using the specific Linux distribution from the installed ones.
Using Git with Visual code editor
Git helps to keep track of the flow of new features across multiple developers on the same project with the tools to analyze and fix problems when the same file is edited by more than one developer.
A large number of software projects all over the world rely on Git for version control, including projects in the commercial and open-source.
The original concepts of the Git were to make a revision control system distributed that makes it faster than the CVS.
It is intended primarily for gnu / Linux, of course, and it has the characteristic of being very rapid, peer-to-peer network, a secure, flexible, and with a tree, a complete history is available off-line.
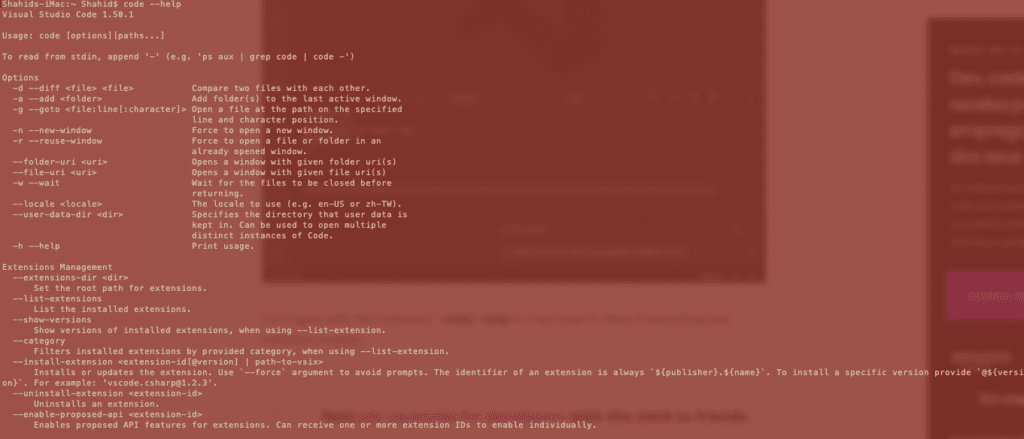
Initially, before you can configure git to use the VSCode, it is necessary to verify that the Path in the Code is properly installed.
You can do this by using the command code --help in a terminal and if everything works correctly, you will be able to see a list of all the commands that the Code must be available.
code –help command not working
If you see “command not found ” error message. Follow these steps to fix the error first before proceeding to install Git.
- Open the Visual Studio Code.
- To open the palette from the command prompt, you can do so by selecting the gear icon from the bottom-left corner, and then select the
command paletteoption from the dropdown. You can also use keyboard shortcut cmd + shift + p on MAC or ctrl + shift + p on Windows top open command palette.

- Now in the drop down type following
>Shell command: install 'code' command in pathand press enter. - Now try again
code --help, it should work this time and should output similar to below screenshot.
Setting up Git with Visual Studio code
The path to the Code is installed, you can launch the setup from the Git.
Now, to set up Visual Studio to Code as your default editor, enter the following line of code in the terminal:
git config --global core.editor
Finally, we have verified that everything works correctly by opening the configuration file in the git by typing into the terminal:
git config --global -e
After you have set up Visual Studio as your default editor, with the command git config –global -e will open the file .gitconfig-global – in Visual Studio Code.
setting up Visual Studio as a difftool for git
To make your Visual Studio Code your difftool , you need to configure the global configuration file of the Git.
So, you can access it via the command git config –global -and , but you will need to add these entries, or overwrite the one you already have:
[diff]
    tool = vscode
[difftool "vscode"]
    cmd = code --wait --diff $LOCAL $REMOTE
Installing and configuring ESLint in VS Code
ESLint is a highly recommended tool to install on your system if you are working with JavaScript code. It will show you errors in your code, as well as guide you as you write it in a consistent manner.
Before proceeding to the ESLint installation, we first install “Node.js v12.x” on the OS.
Runthe following command in Ubuntu to install Node.js
curl -sL https://deb.nodesource.com/setup_12.x | sudo -E bash -
sudo apt-get install -y nodejs
We will enter these commands through the VS Code terminal. You can open it by pressing keys Ctrl+Shift+`or by clicking in the main menu on the item “Terminal -> Create terminal”.
You can check the installed version of “Node.js” by running the following command:
node -v
After installing “Node.js”, let’s create a folder for the project in the OS file system and then open it with VS Code.
Building a project usually starts with initializing it with npm. This process can be accomplished with the following command:
npm init -y
As a result of this command, you will have a file “package.json”. This file, in addition to information about the project and other things, will also contain a set of dependencies for this project. This file helps in deploying the project on any other computer.
Now let’s move on to installing ESLint and some other npm packages into the project:
sudo npm install --save-dev eslint eslint-config-airbnb-base eslint-plugin-import
The key is --save-dev used to record these packages in package.json. This key will add them to the section devDependencies.
Installation of npm packages is carried out in the “node_modules” folder of this project.
We’ll be using Airbnb as our code style . This guide is used by many well-known organizations and has a very large number of stars on GitHub.
In order to be able to use Airbnb to extend the basic ESLint configuration, we installed packages eslint-config-airbnb-base(no React dependencies) and eslint-plugin-import(to support ES6 + import / export syntax and prevent problems with misspelling file paths and import names).
After finishing downloading the packages, let’s start integrating ESLint into Visual Studio Code. This is done by installing the extension with the same name.
In order for ESLint to work, you need to create a configuration file. This can be done both by means of a command ./node_modules/.bin/eslint --init (setting is carried out by answering the questions of the wizard), or independently.
The configuration file is required to set the settings according to which ESLint will perform JavaScript code validation.
To do this on our own, we need to create a file in the project root .eslintrc and add, for example, the following data to it:
{
  "env": {"browser": true, "es6": true},
  "extends": "airbnb-base",
  "parserOptions": {"ecmaVersion": 6}
}
This data will determine the following settings for ESLint:
envis a property that defines the environments in which JavaScript should run. For the frontend, the environment is the browser.extends– is intended to indicate the configuration with which we want to extend the general ESLint configuration.extendsLet’s specify configurationairbnb-base(without React) as a value .parserOptions– allows you to set the parameters for the JavaScript language that we want to support. Currently, it is recommended to use ECMAScript 6 syntax when developing projects
If you need to additionally lint errors of the code placed in the <script> tag, then install the plugin eslint-plugin-html by running following command:
sudo npm install --save-dev eslint-plugin-html
We will format the JavaScript code using Prettier. To fix the working of Prettier and ESLint, install the following npm packages:
sudo npm install --save-dev prettier eslint-plugin-prettier eslint-config-prettier
In order for ESLint not to view certain folders and not give errors on them, you should create a file .eslintignoreand register them in it:
/.vscode
/.git
node_modules
Uninstall Visual Studio Code
In Windows, just remove it from Add/Remove Program.
The uninstallation process of VS Code is little different on Linux machine.
Simply by running following command you can uninstall and remove repository.
sudo apt purge code
And if the installation was performed through the snap package manager or the application center, then to remove it, just run:
sudo snap remove cod
Also read: